

")
 Deutsch (Deutschland)
 Español (España)
 Français (France)
 Italiano (Italia)


YOUR QUICK GUIDE TO SETTING RIVETS
_________________________________________________
If you’re starting out in leathercraft and looking for some straightforward advice on how to use a setting tool, all the individual components required including all the tools you need, then read our guide below.
OUR CONTRIBUTOR
ALEX SULLIVAN
_________________________________________________
Alex started working with leather in 2014 during recovery from hip surgery, since then he has found a real passion for the craft.
He took a job with Tandy Leather in their flagship Manchester store, where he became the Senior Sales Advisor and Social Media Manager.
During his time with Tandy he had the opportunity to meet and visit with a whole host of leather workers from around the world, picking up on the nuances from each profession to compliment his leather work education, and he found a real passion for sharing this information and trying to keep the art of leather work alive.
Alex is open to all suggestions and love learning new skills and more efficient methods of working.
"Learn, Inspire, Teach"


Rivets are an essential component in various industries, from construction to fashion, serving as reliable fasteners that withstand tremendous force and strain. Whether you're a seasoned professional or just starting your journey in craftsmanship, understanding how to properly set rivets is crucial.
But why rivets? Riveting offers distinct advantages over other fastening methods. Rivets provide unmatched strength, durability, and reliability, making them ideal for joining materials that undergo significant stress or vibration. From assembling structural steel to crafting leather goods, rivets offer a versatile solution for a wide range of applications.
Whether you're repairing a a dog collar, constructing a metal sculpture, or fashioning leather accessories, mastering the art of rivet setting opens a world of possibilities. With the right knowledge and techniques at your disposal, you'll be able to tackle riveting projects with confidence and precision.
So, whether you're a hobbyist tinkering in your workshop or a professional tradesperson honing your skills, we have put together a quick guide full of helpful tips and tricks along with the help of our contributor Alex Sullivan to show you how easy it can be to use a rivet and washer.
STEP BY STEP GUIDE TO SETTING RIVETS
Punch holes the same size as your rivet
Slide the rivet post through the holes
Place the washer on top
Use the setting hole on the setting tool to push the washer down the post
Cut to length
Use the peening hole on teh setting tool to mushroom over the rivet
TOOLS THAT YOU WILL NEED
_________________________________________________
COPPER RIVETS & WASHERS
This 2 part fixing requires a washer which is a friction fit to be hammered down the stem until secure. Any excess stem can be removed with metal side cutters. Then use our copper rivet setter to create a secure, safe and neat fixing.
Washers sold separately.

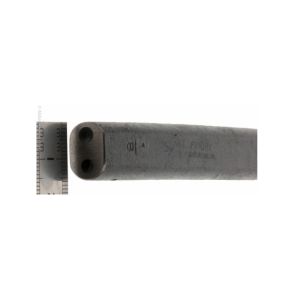
COPPER RIVET SETTER
A copper rivet setter is a 2-part tool in on. One part pushes the washer down the rivet to make a secure fixing so it can be then cut to the correct length. Then use the doming part to finish the rivet off to create and secure a safe fixing.
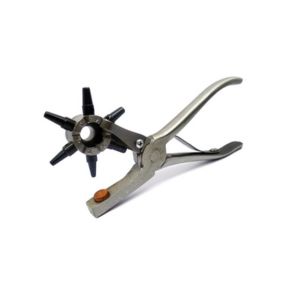
REVOLVING PUNCH PLIER
For professional use and industrial use, this 6 tube punch is made with tubes 0, 1, 2, 3, 4, 5, 6, and 7.
The punch is known as the best revolving punch made. The frame is made of forged steel and the cutting tubes are turned from special carbon tool steel.
RAWHIDE OR PLASTIC MALLET
Due to the hammers' ability to have interchangeable faces, the product is mostly used as a multi-purpose striking tool in a wide variety of assembly applications including engineering, furniture, shopfitting, partitioning, double glazing, injection moulding dies and general purpose use.

RAWHIDE MALLET
A must have for all leather workers, this mallet is lightweight but effective in all aspects of the daily workshop life. An excellent hammer used for stitch marking and crew punching.
Cylindrical compressed Water Buffalo Hide head provides a large striking surface with relatively light head weight. Most commonly used in sheet metal forming and the jewellery industry.
.jpg)
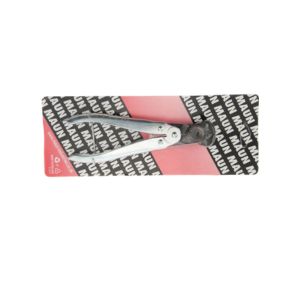
NIPPERS
End cutting nippers are a set of pliers with a cutting edge designed to help cut through material with a flush finish.
The cutting jaws of these pliers are perpendicular to the handle, allowing it to sit flush with the surface, creating a cut that avoids extra material rising above the cutting surface.
VIEW OUR OTHER GUIDES HERE


YOUR QUICK GUIDE TO SETTING RIVETS
_________________________________________________
If you’re starting out in leathercraft and looking for some straightforward advice on how to use a setting tool, all the individual components required including all the tools you need, then read our guide below.
OUR CONTRIBUTOR
ALEX SULLIVAN
_________________________________________________
Alex started working with leather in 2014 during recovery from hip surgery, since then he has found a real passion for the craft.
He took a job with Tandy Leather in their flagship Manchester store, where he became the Senior Sales Advisor and Social Media Manager.
During his time with Tandy he had the opportunity to meet and visit with a whole host of leather workers from around the world, picking up on the nuances from each profession to compliment his leather work education, and he found a real passion for sharing this information and trying to keep the art of leather work alive.
Alex is open to all suggestions and love learning new skills and more efficient methods of working.
"Learn, Inspire, Teach"
Rivets are an essential component in various industries, from construction to fashion, serving as reliable fasteners that withstand tremendous force and strain. Whether you're a seasoned professional or just starting your journey in craftsmanship, understanding how to properly set rivets is crucial.
But why rivets? Riveting offers distinct advantages over other fastening methods. Rivets provide unmatched strength, durability, and reliability, making them ideal for joining materials that undergo significant stress or vibration. From assembling structural steel to crafting leather goods, rivets offer a versatile solution for a wide range of applications.
Whether you're repairing a a dog collar, constructing a metal sculpture, or fashioning leather accessories, mastering the art of rivet setting opens a world of possibilities. With the right knowledge and techniques at your disposal, you'll be able to tackle riveting projects with confidence and precision.
So, whether you're a hobbyist tinkering in your workshop or a professional tradesperson honing your skills, we have put together a quick guide full of helpful tips and tricks along with the help of our contributor Alex Sullivan to show you how easy it can be to use a rivet and washer.
STEP BY STEP GUIDE TO SETTING RIVETS
Punch holes the same size as your rivet
Slide the rivet post through the holes
Place the washer on top
Use the setting hole on the setting tool to push the washer down the post
Cut to length
Use the peening hole on teh setting tool to mushroom over the rivet
TOOLS THAT YOU WILL NEED
_________________________________________________
COPPER RIVETS & WASHERS
This 2 part fixing requires a washer which is a friction fit to be hammered down the stem until secure. Any excess stem can be removed with metal side cutters. Then use our copper rivet setter to create a secure, safe and neat fixing.
Washers sold separately.
COPPER RIVET SETTER
A copper rivet setter is a 2-part tool in on. One part pushes the washer down the rivet to make a secure fixing so it can be then cut to the correct length. Then use the doming part to finish the rivet off to create and secure a safe fixing.
REVOLVING PUNCH PLIER
For professional use and industrial use, this 6 tube punch is made with tubes 0, 1, 2, 3, 4, 5, 6, and 7.
The punch is known as the best revolving punch made. The frame is made of forged steel and the cutting tubes are turned from special carbon tool steel.
RAWHIDE OR PLASTIC MALLET
Due to the hammers' ability to have interchangeable faces, the product is mostly used as a multi-purpose striking tool in a wide variety of assembly applications including engineering, furniture, shopfitting, partitioning, double glazing, injection moulding dies and general purpose use.
RAWHIDE MALLET
A must have for all leather workers, this mallet is lightweight but effective in all aspects of the daily workshop life. An excellent hammer used for stitch marking and crew punching.
Cylindrical compressed Water Buffalo Hide head provides a large striking surface with relatively light head weight. Most commonly used in sheet metal forming and the jewellery industry.
NIPPERS
End cutting nippers are a set of pliers with a cutting edge designed to help cut through material with a flush finish.
The cutting jaws of these pliers are perpendicular to the handle, allowing it to sit flush with the surface, creating a cut that avoids extra material rising above the cutting surface.
VIEW OUR OTHER GUIDES HERE